Perfectly shaped brows can transform your entire look—but achieving symmetry and balance isn’t always as simple as tweezing a few stray hairs. If you’re searching for clear, practical guidance on advanced brow mapping techniques, you’re likely looking to elevate your skills beyond basic shaping and finally understand the science behind precise brow design.
This article breaks down the exact measurements, facial landmarks, and proportional strategies professionals use to create brows that complement your unique bone structure. We’ll explore how mapping enhances symmetry, prevents over-tweezing, and supports long-term brow health—whether you’re a beauty enthusiast or refining your professional technique.
To ensure accuracy, we’ve reviewed current aesthetic best practices and consulted licensed skincare and beauty experts who specialize in facial symmetry and brow artistry. By the end, you’ll have a clear, step-by-step understanding of how to apply advanced brow mapping techniques with confidence and precision.
Perfectly symmetrical brows sound simple, yet anyone who has tried shaping them at home knows the frustration. One arch sits higher, the tail drifts too low, and you are in rescue mode. The classic pencil trick, which uses a pencil to mark start, arch, and end points, seems foolproof. However, it ignores facial asymmetry, meaning your features are not mirror images. So what works instead? Professionals rely on advanced brow mapping techniques, a measuring method that uses facial landmarks and proportional guidelines. In other words, you map before you tweeze. As a result, your brows frame, not fight, your face.
Move beyond the Golden Ratio. The classic nose-to-eye method is a helpful baseline, but it is not law. In practice, strict symmetry can look stamped on rather than sculpted. Instead, think of mapping as a guideline that frames the face, not a ruler that controls it. When you understand this shift, you gain flexibility and far more natural results.
Next, consider facial asymmetry. Almost every face tilts slightly, one eye sits higher, or one brow bone projects more. That is normal anatomy, not a flaw. By adjusting start points, arch height, and tail length to balance these differences, you create the illusion of harmony. The benefit? Brows that make the entire face appear lifted and aligned without obvious cosmetic effort.
Equally important is facial anatomy. The supraorbital ridge, or brow bone, determines how light hits the arch. Meanwhile, muscle movement influences how brows rise or flatten during expression. Use advanced brow mapping techniques to work with these structures, not against them.
Ultimately, the goal is sisters, not twins. Custom-fit brows enhance proportion, soften features, and deliver a polished yet believable finish. This personalized approach gives you confidence, longevity in your shape, and results that photograph beautifully from every angle effortlessly.
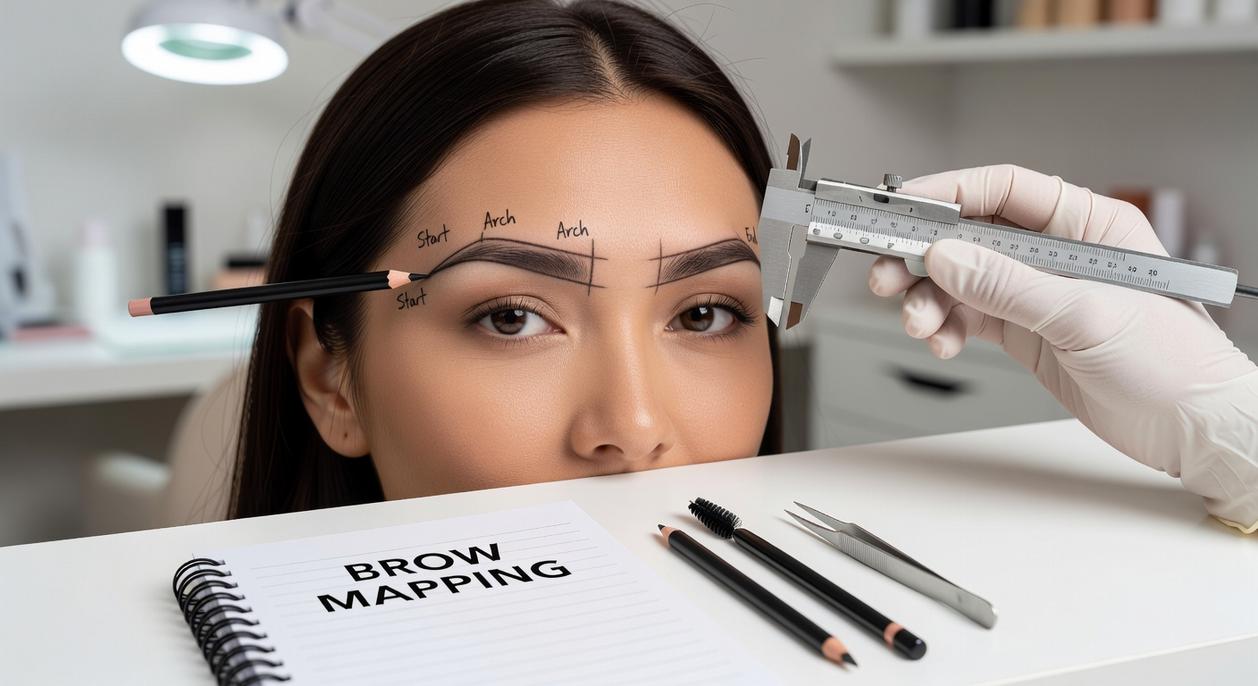
Technique 1: Millimeter-Perfect Precision with Digital Calipers
Mastering advanced brow mapping techniques can elevate your beauty game, creating that perfect symmetry and balance that can be seen in many viral makeup transformations—discover the artistry behind these incredible looks in our article, “Behind the Scenes of Viral Makeup Transformations.
A digital caliper is a handheld measuring tool designed to capture extremely small distances with millimeter accuracy. Originally used in engineering and medical settings, it’s now a quiet hero in beauty for mapping brows with near-surgical precision.
So how does it work in practice? First, measure the ideal starting point: align the caliper vertically from the side of the nose to the brow line. Next, measure the distance from the start to the highest arch point. Then record the length from arch to tail. Finally, check brow thickness at the head, mid-brow, and tail to ensure balanced tapering. Use advanced brow mapping techniques to confirm symmetry before shaping.
Now compare that to freehand tweezing. A vs B: guessing with a pencil versus measuring with a calibrated tool. Freehand shaping can look fine one day and uneven the next (we’ve all had that “why is one brow surprised?” moment). A caliper, however, creates a repeatable brow prescription you can follow every appointment.
Because the numbers don’t lie, consistency improves dramatically. Pro tip: use a skin-safe, fine-tipped makeup pencil to mark each measured point before tweezing, waxing, or filling.
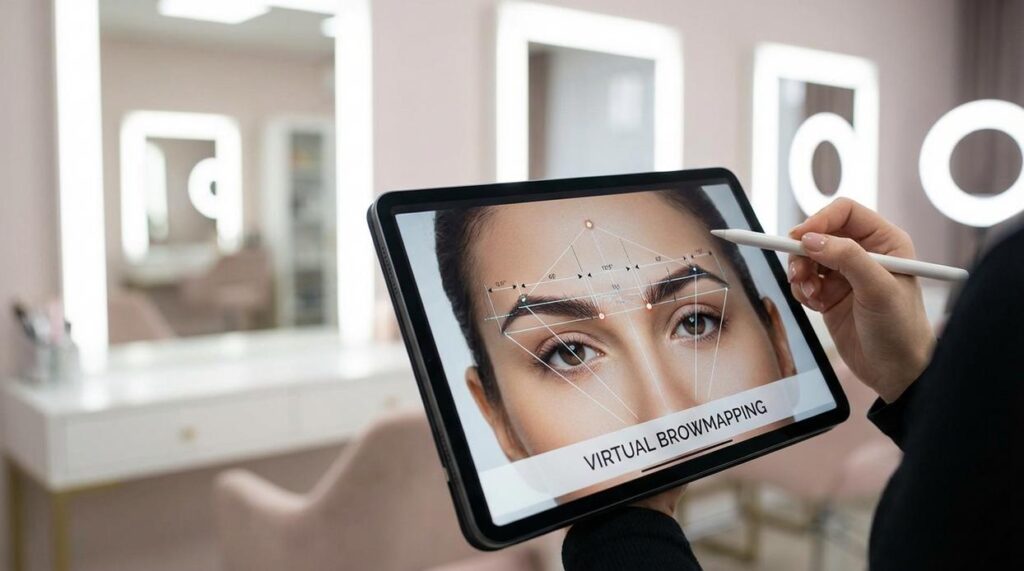
Technique 2: Virtual Try-On with Brow Mapping Apps
First, let’s define augmented reality (AR). AR is technology that layers digital elements—like grids or brow outlines—over your real-time image (think Pokémon Go, but for your face). In beauty, it’s become a game-changer.
Traditional brow mapping relies on pencils and string measurements. In contrast, brow mapping apps create instant digital symmetry guides. Manual mapping vs. virtual mapping comes down to precision versus flexibility: one is tactile and hands-on; the other is adjustable with a swipe.
To use them effectively, start with a well-lit, straight-on photo. Natural light is best (bathroom shadows are not your friend). Then align the grid to your facial landmarks—inner brow start, arch peak, and tail end. From there, experiment with arch height and thickness using the app’s sliders. This is where advanced brow mapping techniques can be visualized without touching a single hair.
The key benefit? Commitment-free testing. Thin and lifted vs. soft and straight—you see both instantly. It’s like a fitting room for your brows.
Look for apps with adjustable arch controls, thickness tools, and grid overlays for maximum customization.
And if you’re comparing enhancement options overall, check out this lash lifting vs extensions technique comparison guide for a side-by-side beauty breakdown.
Technique 3: The Inked String Method for Flawless Symmetry
The Inked String Method is the professional’s secret for creating balanced brows, borrowed from microblading studios and adapted for at-home precision. Essentially, it uses pigment-coated thread to “stamp” crisp guidelines onto the skin—think of it as drafting blueprints before building (measure twice, tweeze once).
First, cut a thin cotton thread about 12 inches long. Next, coat it lightly with a dark brow powder or even concealer for contrast. Make sure the pigment is evenly distributed; too much product can smudge, while too little won’t leave a visible mark. Then, hold the string taut and press it firmly against the skin to transfer straight, clean lines.
Start by stamping vertical lines to mark where each brow should begin, typically aligned with the sides of your nose. After that, create horizontal lines for the top and bottom borders to define thickness. Finally, angle the string from the nostril through the pupil to map the arch, and from the nostril to the outer corner of the eye for the tail.
This structured framework—often used in advanced brow mapping techniques—ensures symmetry. As a result, filling, shaping, or tweezing becomes nearly foolproof.
Your Precision Era Starts Now
You’ve moved beyond guesswork. With advanced brow mapping techniques, visualization apps, precision calipers, and string outlining in your toolkit, uneven arches don’t stand a chance. Have you ever wondered why one brow always seemed to misbehave? Or why “just tweezing a little” turned into a shape spiral? Now, instead of frustration, you have strategy. Try combining methods—preview the look digitally, measure for symmetry, then outline before removing a single hair. (Yes, it’s a bit architect-meets-artist.) So next session, which technique will you test first to see the difference in balance and definition?
Elevate Your Brow Game with Precision and Confidence
You came here wanting clarity on how to shape, define, and perfect your brows with confidence. Now you understand the techniques, tools, and strategies that turn uneven arches and guesswork into structured, face-framing results.
Struggling with asymmetry, sparse areas, or brows that never quite match your features can be frustrating. That’s exactly why mastering advanced brow mapping techniques changes everything. When you map with precision, you stop over-tweezing, avoid harsh angles, and create balance that enhances your natural beauty instead of fighting it.
The difference between average brows and flawless ones is intention. With the right approach, you can achieve symmetry, proportion, and a polished finish every single time.
Now it’s your move: start applying these mapping principles during your next brow session and see the transformation for yourself. If you’re ready to eliminate brow frustration for good and get expert-backed beauty insights trusted by thousands of beauty enthusiasts, explore more of our proven techniques today. Your most balanced, sculpted brows are just one smart step away.