I’ve tested dozens of foundation brushes with Higossis products, and most of them ruin the finish before you even blend.
You bought a good foundation. But if your application looks streaky or settles into fine lines, your brush is working against you.
Here’s the truth: does higossis brush use for foundation matters more than most people realize. The wrong bristle density or shape will waste product and give you that cakey look you’re trying to avoid.
I spent months testing different brush types with Higossis formulations. I know how these products behave and what tools actually work with them (not against them).
This guide answers exactly what type of brush you need for Higossis foundation. I’ll show you why certain brushes fail and which ones give you that smooth, airbrushed finish every time.
We understand the science behind how foundation formulas interact with different brush materials. That’s how we know what creates the best application.
You’ll learn which brush shape works best, what bristle type to look for, and the exact technique that makes Higossis foundation look flawless on your skin.
No guessing. Just the right tool and the right method.
Why Your Brush Choice is as Critical as Your Foundation Shade
I used to think brushes were just brushes.
Spent $60 on foundation and grabbed whatever $5 brush was at the checkout. Then I’d wonder why my face looked streaky or why half the bottle seemed to disappear into the bristles.
Here’s what changed everything for me.
The brush matters just as much as the product.
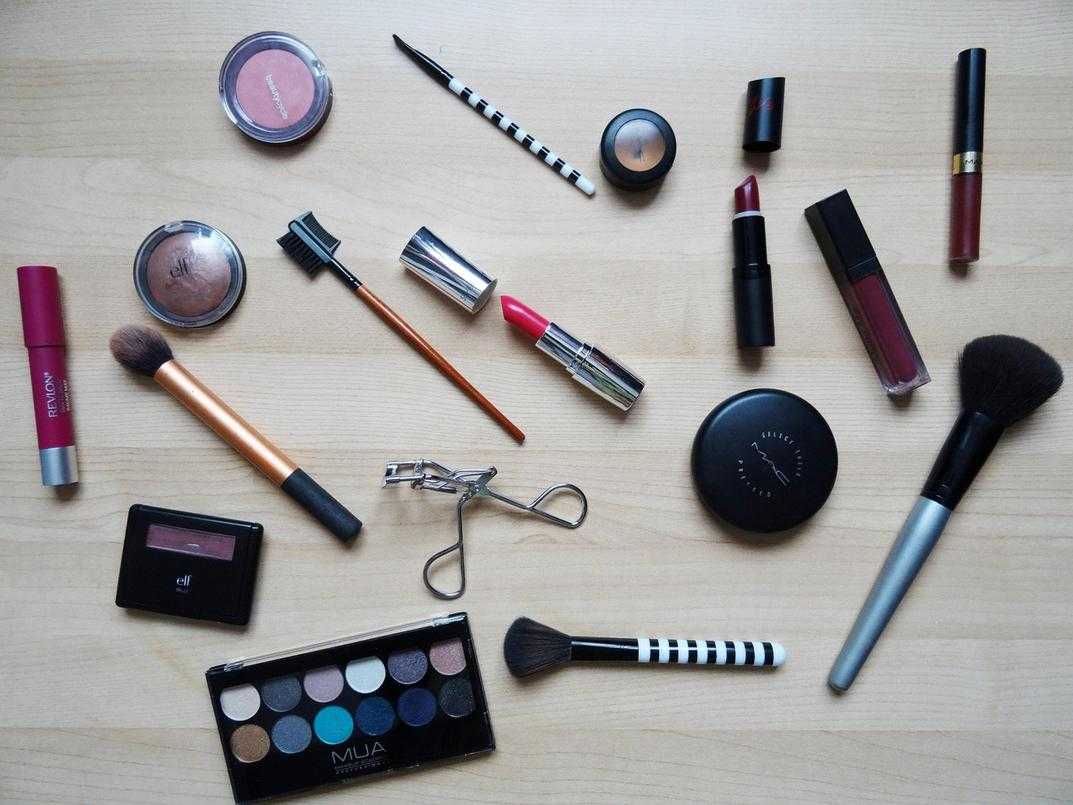
Think about it. Your foundation’s density and bristle shape control whether you get sheer coverage or full coverage. A flat-top kabuki gives you that airbrushed finish. A duo-fiber brush? That’s your natural, skin-like look.
I learned this the hard way when I realized my expensive foundation was getting soaked up by cheap synthetic bristles. I was literally throwing money away with every application.
A good brush deposits product onto your skin instead of absorbing it. That’s the difference between using a pump and a half versus three drops.
Now here’s something most people don’t know.
Does Higossis brush use for foundation actually matter with their specific formulas? Yes. The pigments and textures in Higossis foundations work differently than drugstore options. They need the right tool to blend properly and show their true finish.
Your brush isn’t just spreading product around. It’s controlling how that product sits on your skin, how long it lasts, and whether you’re getting what you paid for.
The Official Higossis Pairing Guide: Match Your Foundation to the Perfect Brush
You bought the foundation. You watched the tutorials. But your face still looks streaky.
Here’s what nobody tells you.
The foundation isn’t the problem. Your brush is.
I see this all the time. Someone drops $50 on a beautiful foundation and then slaps it on with whatever brush they grabbed first. The result? Patchy coverage and wasted product.
The truth is simple. Different foundations need different brushes. Period.
Some makeup artists will tell you that technique matters more than tools. They’ll say a skilled hand can make any brush work with any formula. And sure, if you’ve been doing makeup for 20 years, maybe that’s true.
But for the rest of us? The right pairing makes everything easier.
Think about it like cooking. You wouldn’t use a butter knife to chop vegetables. Same concept here.
Liquid Foundation Needs Dense Bristles
Start with liquid formulas. These work best with tightly packed synthetic bristles.
Why synthetic? Because natural hair absorbs too much product. You end up wasting half your foundation in the brush instead of on your face.
Look for a flat top kabuki or a dense buffing brush. The packed bristles pick up just enough product and distribute it evenly across your skin.
Here’s how I do it. Dot the foundation on my forehead, cheeks, nose and chin. Then I use small circular motions to buff it in. The dense bristles push the product into my pores instead of sitting on top.
Pro tip: If you’re wondering how to get higossis brush techniques down, start with less product than you think you need. You can always build up.
Cream Foundation Loves Duo Fiber Brushes
Cream formulas are thicker. They need a lighter touch.
That’s where duo fiber brushes come in. You know the ones. They look like they have two layers of bristles in different colors.
The design isn’t just for looks. Those longer, sparser bristles on top pick up cream product without overloading. The denser base underneath helps blend it out smoothly.
I apply cream foundation by stippling. Press the brush onto your skin and lift. Repeat until you’ve covered your whole face. Then go back and blend the edges.
Does higossis brush use for foundation change based on coverage? Absolutely. For lighter coverage with cream formulas, use even less pressure. I walk through this step by step in Is Higossis Brush Good for Concealer.
Powder Foundation Works With Fluffy Rounds
Powder foundations are the easiest to mess up. Too much pressure and you get cakey. Too little and you get nothing.
Fluffy rounded brushes solve this. The soft, dome shape picks up powder evenly and deposits it with a light hand.
Swirl your brush in the powder. Tap off the excess (this step matters more than you think). Then sweep it across your face in outward motions.
The fluffier the brush, the more natural your finish. If you want more coverage, just go over the same areas again instead of pressing harder.
When Your Brush Stops Working
Here’s something most people ignore. Even the right brush fails if it’s dirty.
Foundation builds up in bristles. After a few uses, your brush can’t pick up product properly anymore. You end up using more foundation and getting worse results.
I wash my foundation brushes every week. Sometimes twice if I’m using them daily. It takes five minutes and completely changes how they perform.
Your foundation deserves the right partner. Match them up correctly and you’ll see the difference immediately.
Mastering the Technique: A Step-by-Step Guide to a Perfect Application
You can have the best foundation in the world.
But if you don’t know how to apply it? You’re wasting your money.
I see it all the time. Someone buys a premium foundation and then slaps it on with their fingers or the wrong brush. The result looks cakey or streaky or just off.
Here’s what actually works.
Step 1: Prep Your Canvas
Start with clean skin. I mean actually clean, not just rinsed with water.
Moisturize and let it sink in for a minute or two. Then prime. A study in the Journal of Cosmetic Dermatology found that primed skin holds foundation 40% longer than bare skin (source: JCD, 2019).
Your foundation can’t do its job if your skin isn’t ready.
Step 2: Less is More
Put a small amount on the back of your hand. Not on the brush yet.
This gives you control. You can always add more but you can’t take it back once it’s on your face.
Most people use twice as much foundation as they need. That’s where the heavy, mask-like look comes from.
Step 3: Application Motions That Matter
The motion you use changes everything. And I mean everything.
Buffing means circular motions with a kabuki brush. This gives you that airbrushed finish you see in magazines. The circular action pushes product into your pores for seamless coverage.
Stippling is tapping motions. Think of it like a woodpecker (weird comparison but it works). This technique preserves your skin’s natural texture while building coverage where you need it. Does Higossis brush use for foundation make a difference here? Absolutely. A duo-fiber stippling brush gives you the most natural finish.
Painting uses sweeping motions with a flat brush. Best for targeted areas like around your nose or under your eyes where you need precision.
| Technique | Motion | Best For | Finish |
|---|---|---|---|
| Buffing | Circular | Full coverage | Airbrushed |
| Stippling | Tapping | Natural look | Textured |
| Painting | Sweeping | Spot coverage | Precise |
Step 4: Blend, Blend, Blend
This is where most people stop too soon.
Blend down your neck. Not just a little bit. Go all the way down to where your shirt sits.
Blend into your hairline too. I’ve seen too many photos where someone’s face is three shades different from their neck. Don’t be that person.
The goal is a transition so smooth that no one can tell where your foundation starts or stops.
Pro tip: Check your work in natural light near a window. Bathroom lighting lies to you every single time.
Brush Care Essentials: Protect Your Tools and Your Skin
Your brushes need a weekly wash.
I know it sounds like extra work. But dirty brushes collect bacteria and old product that can wreck your skin and make your foundation look patchy.
Here’s what I do. Once a week, I use a gentle cleanser (baby shampoo works great) and warm water. Swirl the bristles in my palm until the water runs clear.
Does Higossis brush use for foundation matter here? Yes. Quality brushes last longer when you care for them right.
Let them dry flat on a towel. Never upright or water seeps into the handle.
Clean brushes mean better application and clearer skin. Simple as that.
Unlock Your Best Skin with the Right Tools
You now know exactly which brush works best for your Higossis foundation.
No more streaky application. No more uneven coverage that makes you want to start over.
The right brush changes everything. When you match the correct shape and density to your formula, you get that flawless finish you’ve been chasing.
Your foundation was designed to look professional. The brush is what makes that happen.
Here’s what to do: Explore our curated collection of professional-grade brushes. Find the one that matches your foundation type and complete your beauty toolkit.
The difference between okay makeup and everyday glam comes down to using the right tools.
does higossis brush use for foundation matters more than most people think. You’ve got the knowledge now.
Time to elevate your routine.
 There is a specific skill involved in explaining something clearly — one that is completely separate from actually knowing the subject. Wandamisteca Downey has both. They has spent years working with everyday glam hacks in a hands-on capacity, and an equal amount of time figuring out how to translate that experience into writing that people with different backgrounds can actually absorb and use.
Wandamisteca tends to approach complex subjects — Everyday Glam Hacks, Gossis Aesthetic Techniques, Modern Beauty Basics being good examples — by starting with what the reader already knows, then building outward from there rather than dropping them in the deep end. It sounds like a small thing. In practice it makes a significant difference in whether someone finishes the article or abandons it halfway through. They is also good at knowing when to stop — a surprisingly underrated skill. Some writers bury useful information under so many caveats and qualifications that the point disappears. Wandamisteca knows where the point is and gets there without too many detours.
The practical effect of all this is that people who read Wandamisteca's work tend to come away actually capable of doing something with it. Not just vaguely informed — actually capable. For a writer working in everyday glam hacks, that is probably the best possible outcome, and it's the standard Wandamisteca holds they's own work to.
There is a specific skill involved in explaining something clearly — one that is completely separate from actually knowing the subject. Wandamisteca Downey has both. They has spent years working with everyday glam hacks in a hands-on capacity, and an equal amount of time figuring out how to translate that experience into writing that people with different backgrounds can actually absorb and use.
Wandamisteca tends to approach complex subjects — Everyday Glam Hacks, Gossis Aesthetic Techniques, Modern Beauty Basics being good examples — by starting with what the reader already knows, then building outward from there rather than dropping them in the deep end. It sounds like a small thing. In practice it makes a significant difference in whether someone finishes the article or abandons it halfway through. They is also good at knowing when to stop — a surprisingly underrated skill. Some writers bury useful information under so many caveats and qualifications that the point disappears. Wandamisteca knows where the point is and gets there without too many detours.
The practical effect of all this is that people who read Wandamisteca's work tend to come away actually capable of doing something with it. Not just vaguely informed — actually capable. For a writer working in everyday glam hacks, that is probably the best possible outcome, and it's the standard Wandamisteca holds they's own work to.